
With the FleetAdvance Advisor, you can enter details for an upcoming trip to receive information on the best-priced fuel stops along the route. Key features of the Advisor include:
- Viewing recommended fuel stops for over-the-road routes marked by FleetAdvance scoring pins
- Editing trips in progress
- Adding your preferred fuel stops to a route
- Saving frequent trips
- Ability to specify the distance off route drivers are allowed to travel
- Ability to view all possible fueling locations
The FleetAdvance Advisor is your tool for planning routes that save your company on fuel costs.
To access the Advisor, login to iConnectData (ICD) and select (FleetAdvance QuickLink >Advisor).
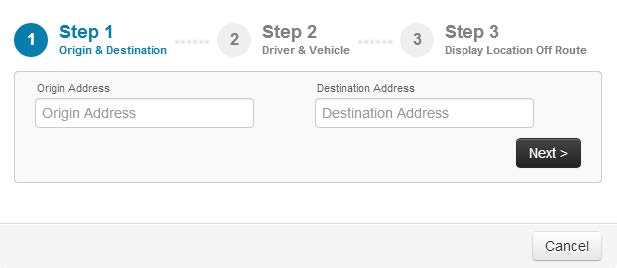
Step 1. Enter your origin and end destinations and select Next. Select Cancel to proceed to the map console and choose from your saved trips.
Note: Entering only a city and state prompts the Advisor to select a random address from within the city.
Step 2. Select a customer ID, then add any of the following details: Driver ID, Vehicle ID, MPG (defaults to the industry standard of 5.3), Tank Size (defaults to the industry standard of 240 gallons), and Starting Tank Fill. Select Next.

Step 3. Select the distance off route that you would like to see additional fueling locations. Defaults to 1 mile off route. Any of these locations can be added to change your route. Select Show Trip.
You will see your trip route in the Advisor map console designated by a blue line. The console indicates your recommended fuel stops using FleetAdvance transaction scoring pins.

Select the print icon in the top right corner to print your route.
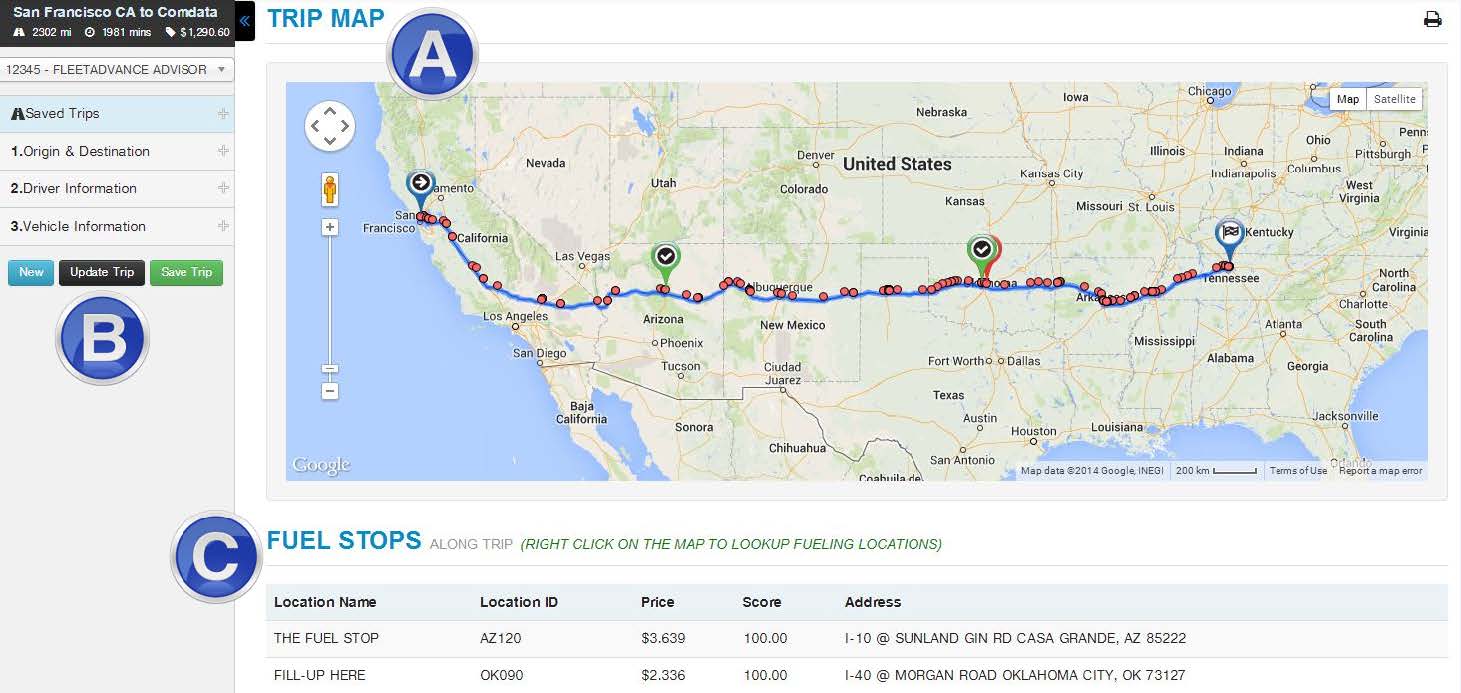
A. Trip Map
The Trip Map displays your proposed route and recommended fuel stops designated by transaction scoring pins. It also displays fuel stops outside of your route designated by red dots. Select a pin or red dot to view the truck stop location name, fuel price, and FleetAdvance score.
A small blue line designates your main route, while a larger one designates your specified miles off route. Red dots populate the larger line so you can see where additional fuel stops are located. To add any location to your route, select a pin or a red dot and select Add to Route or Remove from Route to remove it. The small blue line will change accordingly, and your trip information will automatically update.
Note that once you add a red dot to your route, a scoring pin will display with a checkmark. If you remove the location, the pin will remain on the map and can be added back if necessary.
Alternatively, you can right-click anywhere else on the map to see additional fueling locations. You will be prompted to enter the percentage of gallons to be purchased for the area you selected. If no locations are found, an error message is returned.
Note: The ability to select fueling locations outside of the Advisor’s suggestion provides a view of all possible locations and better control over a driver’s route.
B. Fuel Stops
This section displays each fuel stop added to your route. The Stop number represents the sequence of stops from your origin point. If no price is found at a fuel stop, the Score column will display “N/A”.

C. Left Panel
Use the left panel to edit trip details such as origin and end destination, driver and vehicle information, or miles off route. Select Update Trip after making edits. Saved Trips contains your saved routes.

The top of the panel displays trip statistics such as overall mileage, estimated trip time, and fuel cost (your estimated tank size times the fuel price).
Note: Route recommendations do not consider a driver’s ability to travel (e.g., overhangs, wide load restrictions). Fuel prices include your company’s discounts and taxes.